
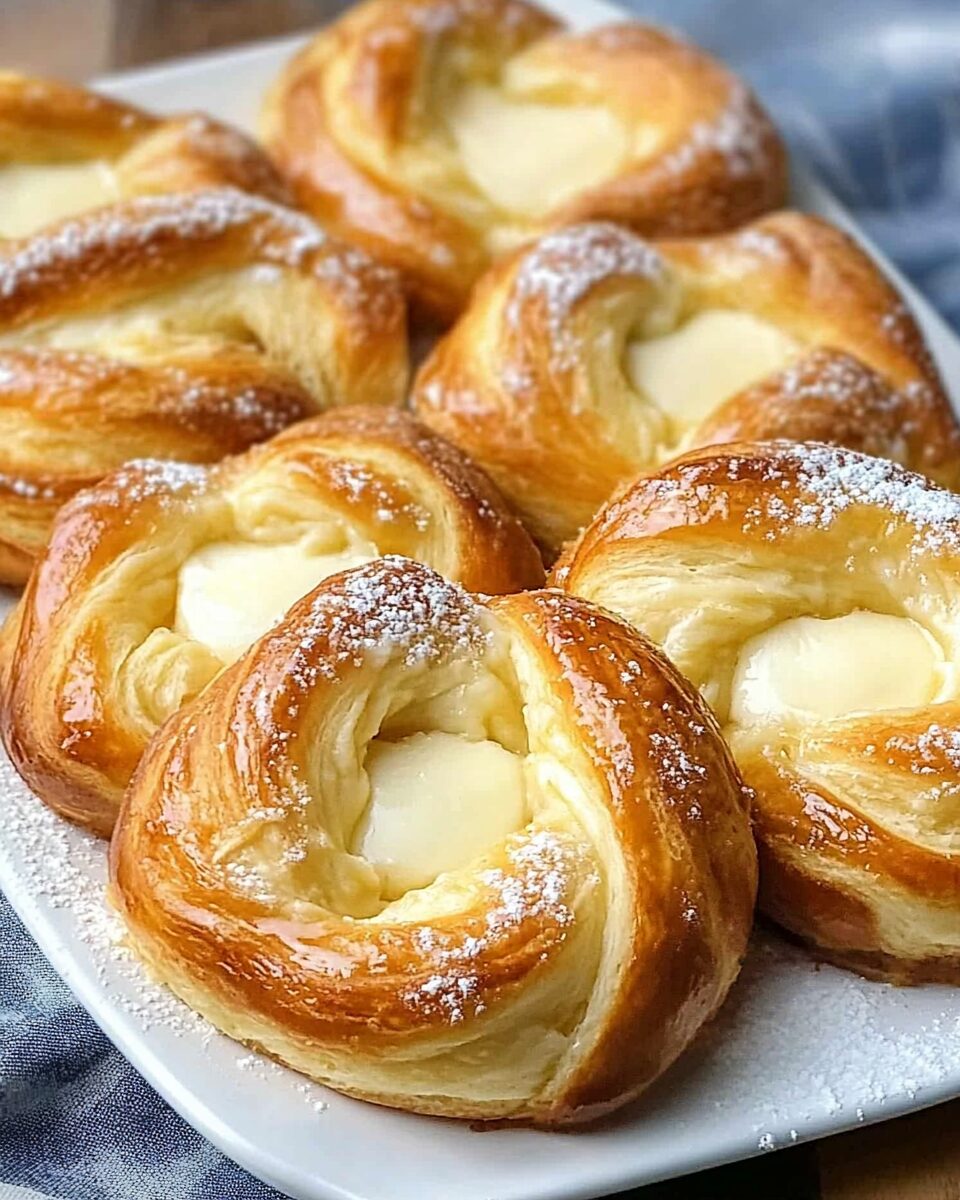
The Heavenly Cheese Danish is a luscious twist on the classic Danish pastry, marrying rich, buttery dough with a tangy-sweet cream cheese filling. These golden coils of indulgence are brushed with maple syrup to finish, giving them a beautiful shine and delicate sweetness.
Perfect for a weekend breakfast, a special brunch, or paired with your favorite morning coffee, this recipe brings the warmth of a bakery into your home kitchen. Though the dough needs some patience, the result is well worth it — tender, flavorful pastries that look and taste like they came from a professional patisserie.
Full recipe:
Ingredients:
-
2 packages (1/4 ounce each) active dry yeast
-
1/2 cup warm water (110° to 115°F)
-
4 cups all-purpose flour
-
1/3 cup granulated sugar
-
2 teaspoons salt
-
1 cup cold butter, cubed
-
1 cup 2% milk
-
4 large egg yolks, room temperature
-
3 teaspoons ground cinnamon
-
12 ounces cream cheese, softened
-
1/3 cup sugar
-
1 large egg, separated
-
1 tablespoon water
-
2 tablespoons maple syrup
Directions:
-
Dissolve the yeast in warm water and let sit until foamy, about 5 minutes.
-
In a large bowl, mix flour, sugar, and salt. Cut in the cold butter until the mixture is crumbly.
-
Add the milk, egg yolks, and yeast mixture; stir to form a soft, sticky dough. Cover and refrigerate for 8 to 24 hours.
-
Punch down the dough and divide into four equal portions. On a lightly floured surface, pat each into a 9×4-inch rectangle.
-
Sprinkle each with 3/4 teaspoon cinnamon. Cut each rectangle lengthwise into four 9×1-inch strips.
-
Twist each strip and loosely coil it around itself; tuck the end under and pinch to seal. Place on greased baking sheets, 3 inches apart.
-
Beat cream cheese, 1/3 cup sugar, and egg yolk until smooth.
-
Press an indentation into the center of each dough coil and fill with 1 rounded tablespoon of the cream cheese mixture.
-
Cover and let rise in a warm place until doubled in size, about 45 minutes.
-
Preheat oven to 350°F. Beat the egg white with 1 tablespoon of water and brush over the dough.
-
Bake for 15–20 minutes, until golden brown. Remove to wire racks and brush with maple syrup. Serve warm.
Prep Time: 50 minutes
Cooking Time: 20 minutes
Total Time: 1 hour 10 minutes
Kcal: 359 kcal per serving
Servings: 16 rolls
The Origins of the Danish Pastry
Despite its name, the Danish pastry actually has Austrian roots. In the 1850s, a strike among Danish bakery workers led to a wave of foreign bakers—particularly Austrians—being brought into the country. These bakers introduced laminated dough techniques, and Danish bakers soon began modifying and personalizing them. The resulting pastry became known as “wienerbrød” or “Vienna bread” in Denmark, but it was eventually rebranded as “Danish” abroad.
The cheese Danish became a uniquely American interpretation of this European treat. The addition of sweetened cream cheese to the center of the pastry reflects a more decadent, dessert-like direction, and it has since become a staple in bakeries, brunch buffets, and home kitchens across North America.
What Makes the Dough Special?
The dough used in this cheese Danish recipe is classified as “enriched.” Unlike lean doughs used in rustic breads, enriched doughs contain fats such as butter, egg yolks, and milk. These additions result in a more tender, rich, and flavorful pastry with a softer crumb and a golden hue when baked.
What sets this particular dough apart is the inclusion of cold butter that’s cut into the flour rather than melted or creamed. This technique creates little pockets of fat that melt during baking, leading to a texture that’s somewhat flaky, reminiscent of laminated dough, but less time-intensive to make.
The dough is refrigerated for 8 to 24 hours, allowing a slow fermentation that enhances the flavor and makes it easier to handle. This overnight proofing is a crucial step for depth of taste, and it also aligns the recipe with professional-level baking practices.
Cream Cheese: The Star of the Filling
The filling of a Heavenly Cheese Danish is what gives this pastry its name and addictive appeal. Softened cream cheese, sweetened lightly with sugar and enriched with egg yolk, is beaten until smooth and creamy. This forms the perfect center for the coiled dough, creating a luscious, tangy bite that contrasts beautifully with the buttery shell.
Cream cheese as a pastry filling is a relatively modern invention, but it has gained immense popularity due to its versatility and luxurious mouthfeel. Its creamy texture doesn’t dry out during baking and adds a satisfying richness that complements the flaky, golden dough.
Flavorings such as vanilla, lemon zest, or almond extract can be added to the filling for extra dimension. Some variations even incorporate fruit preserves or fresh berries alongside the cheese for an extra pop of color and flavor.
The Art of Assembly and Baking
Unlike traditional square or braided Danish shapes, this version features a more playful and approachable shape: strips of dough twisted into spirals and coiled into rounds. Each roll has a small indentation in the center, which cradles the filling and gives the pastries their distinctive look.
This coiled presentation allows the dough to bake evenly, with beautifully browned edges and a soft, tender center. Before baking, an egg wash is brushed over the surface to promote that signature glossy finish. After baking, a brush of maple syrup adds shine and subtle sweetness, taking the Danish to the next level.
The baking process only takes about 15 to 20 minutes, making these pastries a surprisingly accessible project for a weekend morning or special occasion. The end result is a bakery-style treat that’s impressive yet comforting—ideal for both casual breakfasts and elegant brunch tables.
Serving Ideas and Pairings
Heavenly Cheese Danishes are versatile enough to serve in a variety of contexts. For a simple breakfast, they pair beautifully with a strong cup of coffee or a glass of fresh orange juice. Their rich filling and buttery dough make them satisfying on their own, but they also play well with other breakfast staples.
At brunch, consider offering them alongside savory dishes like quiches, frittatas, or breakfast casseroles. They also make a delightful contrast to fresh fruit platters or yogurt parfaits. Because they’re easy to eat by hand, they’re an excellent choice for buffet-style setups or grab-and-go breakfasts during holidays or celebrations.
If you’re hosting a more upscale brunch or afternoon tea, try pairing these Danishes with a chilled glass of sparkling wine or a lightly brewed herbal tea. Their rich yet balanced flavor complements a range of beverages and other foods, making them a flexible and crowd-pleasing addition to any menu.
Variations and Customizations
One of the beauties of the cheese Danish is how customizable it is. The base recipe is a canvas for countless variations that suit different tastes, dietary needs, and seasonal ingredients.
-
Fruit Fillings: Swap some or all of the cream cheese for fruit jam or pie filling. Blueberries, raspberries, and cherries are especially popular choices.
-
Nut Toppings: Sprinkle chopped almonds, pecans, or walnuts over the filling for added crunch.
-
Spices: Add a hint of nutmeg or cardamom to the dough or filling for extra depth.
-
Glazes: Replace the maple syrup with a powdered sugar glaze or a drizzle of honey.
-
Savory Twist: Omit the sugar and make a savory version with goat cheese and herbs or a dollop of ricotta and sun-dried tomatoes.
These ideas allow home bakers to tailor the recipe to suit different seasons, occasions, or personal preferences while still honoring the core of what makes a cheese Danish so irresistible.
Tips for Storing and Reheating
Cheese Danishes are best enjoyed fresh, ideally still warm from the oven. However, they store well and can be made ahead of time for convenience.
Once cooled, store them in an airtight container in the refrigerator for up to 5 days. To enjoy them later, simply bring to room temperature or warm them gently in the oven for a few minutes. Avoid microwaving, as it can make the dough soggy.
They also freeze well: wrap each Danish individually in plastic wrap and place them in a freezer-safe container. When ready to serve, thaw at room temperature and refresh in a warm oven for that just-baked feel.
Conclusion: Why This Recipe Deserves a Place in Your Kitchen
The Heavenly Cheese Danish is more than just a breakfast pastry—it’s a celebration of texture, flavor, and tradition. It brings together elements of classic European baking with approachable methods that even beginner home bakers can master. From the buttery, enriched dough to the creamy, sweet-tart filling, every bite is a reminder of how homemade treats can rival anything from a professional bakery.
Whether you’re baking for a special brunch, a holiday gathering, or simply indulging in a weekend project, this cheese Danish delivers comfort and joy in equal measure. With the flexibility to customize and the elegance to impress, it’s a recipe that belongs in every baker’s repertoire.
cam you substitute farmer’s cheese for cream cheese?